
Shooting Fundamentals Trigger Pull & Follow Through One of the most important fundamentals is the trigger pull. In a perfect world, you would have a rock solid grip and ignite the gunpowder by just thinking. But of course, we have to deal with mechanical inputs and human reactions. As a beginner shooter, you know there’s going to be a loud bang with some recoil. So you will likely press the trigger fast to get everything over with, which adds some movement to the gun and barrel. The bullet still takes some time to move down the barrel, and if the gun/barrel moves, your bullet will be off target. So the trick is to cause as little movement to the gun as possible when you are pressing the trigger. Use the middle of the first index finger pad Remove the initial slack or “pre-travel” in the trigger Slowly squeeze the trigger towards the back of the gun “Follow through” by not immediately letting go of the trigger “Reset” the trigger by easing it forward just enough to hear a *click* Slowly squeeze for the next shot Here’s a great short video tutorial. These tips can be used for almost all guns, not just pistols.

Shooting Fundamentals Sight Picture & Eye Dominance Ready to shoot faster and more accurately? We’ll take a look at eye dominance, sight picture, & trigger pull to finish off shooting fundamentals. Eye Dominance Eyes can be dominant just as with hands and legs and an important part of shooting accurately is knowing which eye is dominant. The vast majority of people have dominant eyes that match their dominant hands, but a few (myself included) are cross-dominant. Here is one easy test to see which of your eyes is dominant: Not down for our sweet video right now? It will be easier for beginners to start with closing one eye and using their dominant eye. However, as you progress, you will likely find yourself shooting better with both eyes open. It will take a while to train your brain but you’ll see benefits such as increased depth perception and orientation. Your eye-dominance can often dictate which stance you like better. For me, since I’m left-eye dominant and right hand dominant, I prefer the Modified Weaver/Chapman stance since it puts my left-eye more behind the sights. Still with me? Sight Picture Aim a gun: Just point and shoot, right? In the grand scheme of things, yes, that’s pretty much it. But proper sight picture is one of those fundamental things that makes the difference between a shooter and someone that just plays with guns. The sight picture is everything you see with your sights and your target. There are several different types of sights but most firearms will have a notch or circular rear sight with a post or bead as the front sight. Also very common is the three dot sight. All of them, no matter what their setup, work on the same principle. The front sight can be many things but usually is more contrasting than the rear sight to draw in the eyes. What’s the Over/Under? You’ll then want to make sure you have proper sight alignment. This will vary on your sights but mostly will require you to line up your sights. Where you’ll be hitting also depends on personal preference or more likely…how your gun is set up from the factory. Some people like the first one which is called the “6 o’clock hold” where you line up the bottom of the target with the top of the front sight so you can hit the middle of the target. The second image is the most traditional and called “point of aim, point of impact” where you line up the top of the front sight with where you want to hit. The last image is where you cover where you want to hit with the center of your front sight dot. Where to Focus The final question is where to focus with your eyes. There are three choices—the rear sight, the front sight, or the target. The correct plane to focus on is the front sight, since the bullet will go where the front sight is pointing. Every expert in the world will tell you that you will get the best results by keeping the front sight in focus while pulling the trigger as it will really help you to keep the gun steady. This is the main reason why a lot of front sights are distinctly coloured. When you’re correctly focusing on the front sight, the rear sight and target will appear blurry. The best flow is to first focus on the target and loosely line up the dots on to it. At this point change your focus to that front sight and line it up with the rear sights as well as the blurred out target. As you slowly squeeze the trigger, focus on keeping that front sight as stationary as humanly possible. With that front sight in focus and stationary, your shots will improve greatly. There are also electronic sights that allow for both eyes to be open and focus only on one object. Here is an example of a typical “red dot” sight made by Aimpoint. Math Time In the end, it’s all about keeping your sights lined up perfectly. You should consider perfection a minimal standard in this case. Why? Because of an old dude named Pythagoras. WARNING: MATH LESSON INCOMING! TAKE COVER NOW! In a perfect world, the gun would form a straight line between the barrel and the desired target. In reality, you’re forming a right angled triangle between the desired target, the actual target and the barrel. The goal is to make the angle by the barrel as close to 0º as possible. Even though, at 10 yards, even a 0.5º angle can throw the bullet 3 inches off target. You can calculate that yourself with: Tan(Barrel Angle) x Distance to Target = Bullet Deflection In this example: Tan(0.5º) x 30 feet = .26 feet or just a bit over 3 inches. If you increase the distance but keep the angle the same, you can see just how important keeping your sights lined up actually is. Conclusion Well that’s eye dominance and sight picture in a nutshell. Let us know if this article helped you out and then check out what’s next in our Beginner’s Guide to Guns.

Shooting Fundamentals Shooting Stances & Grip: Isosceles vs Weaver vs Chapman Don’t laugh, but chances are if someone just gave you a gun, you would end up leaning back like this person. Having a proper shooting stance and grip gives you a strong foundation for all the other shooting fundamentals. But don’t worry, we’ll go over the most popular shooting stances, from Isosceles to Weaver to Chapman (aka modified Weaver), then cover how to have a proper handgun grip that gives you maximum control and recoil dampening. Isosceles Stance The isosceles stance gets its name from the arms and chest making an isosceles triangle. Kudos if you remember from geometry that isosceles means two sides are the same. Configuration of Isosceles Shooter faces the target squarely, feet are shoulder-width (or slightly wider) apart with toes pointed at the target. Arms are full extended with the gun in the middle of the chest. There’s a slight lean forward and some bending of the knees. Pros of Isosceles Stance Easier and more natural stance since you are merely “pointing” at the target. The body acts like a turret for easy movement to side targets. This stance is very popular in shooting competitions for easy transitions to different targets. Doesn’t really matter what eye dominance you are. If wearing body armor, you are getting more protection since you are square to the target. Cons of Isosceles Stance Potentially less stable if you are pushed forward / backward (pretty stable for side to side), but this is minimized by bending your knees and putting your weight a little more forward. If not wearing body armor, you are exposing a bigger target. Weaver Stance Developed in the 1950’s by LA County Sheriff Jack Weaver and since popularized by Jeff Cooper and his firearms school, Gunsite. The shooter is more at an angle to the target and the arms are bent. Configuration Non-dominant leg is forward of the dominant leg with a slight forward lean (“nose over toes”). Toes are pointed forward and the firing-side arm is extended while the supporting arm is bend. The shooter employs a “push-pull” grip by pushing with the firing arm and pulling back with the supporting arm. Pros of Weaver Stance Smaller profile to target (“blading” your body”) Better recoil management with the push-pull method More stable since the feet are now staggered. Natural stance if you need to balance yourself. Cons of Weaver Stance Harder to rotate to your non-dominant side since you feel like you’re binding yourself up. For example, the Gunsite instructor above would have a harder time rotating to his left. Harder for cross-dominant shooters (eg right hand dominant and left eye dominant) since the two are now no longer matched up. If in body armor, you expose your side which normally isn’t armored. Modified Weaver Stance (Chapman Stance) Pioneered by competitive shooter Ray Chapman. Very similar to the Weaver Stance except your shooting arm is fully locked out with the support arm bent downwards. Configuration Same as Weaver above except the shooting arm is fully extended, almost like a rifle stock. Some shooters will also create a cheek-weld on their upper arm. Pros of Chapman Stance All of the Weaver Stance Consistency of your arm “stock” and “cheek-weld” to be always the same, instead of hovering in the air with the Isosceles or Weaver. Better recoil management since the firing arm is fully extended Better for crossed-eye dominant shooters since by having a cheek-weld, the opposite eye is more in line with the firearm Cons of Chapman Stance All of the Weaver Stance minus cross-dominant shooting Might strain the neck muscles Verdict of the Best Stance Another of my standard answers…it depends on what you like best and your application. You can choose based on what comes more naturally to you, if you want to compete in shooting sports later, or if you have eye dominance issues. And in many cases, what your instructor prefers when you take a firearms class (you are going to take a class right?). For me, and Hickok45 below, we prefer the Chapman stance because of our crossed-eye dominance issues. I also like the feeling that my “rifle-stock” is always the same. And even though I do some competitive shooting, I don’t really see the moving side-to-side binding issue that much. But don’t take my word for it…try it out for yourself! And here’s a great video of Hickok45 showing you all the stances, since pictures can only do so much. Shooting Grip Don’t do the teacup grip! You’re going to start seeing it in a lot of movies and start groaning after you learn how to properly grip a handgun. We’ll cover modern handguns, revolvers, rifles, and shotguns individually in the next few lessons. But here are some overall tips on gripping a gun. Use a strong grip! You want to be able to control the recoil of the gun and having a strong grip also reduces the movement of the non-trigger fingers. Use your non-dominant hand to cover as much grip as possible.
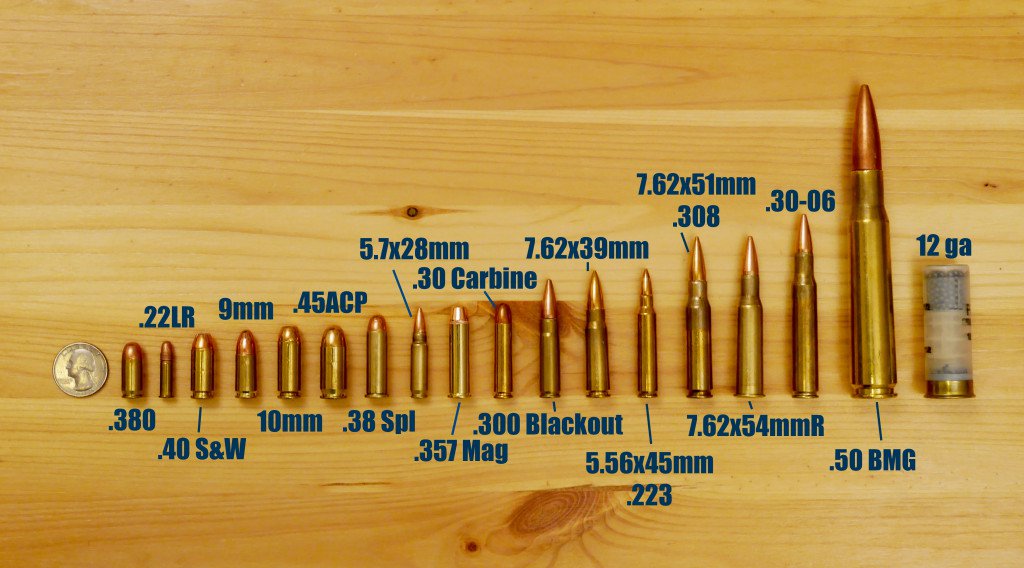
Introduction to Guns Bullets: Sizes, Calibres, and Types [Definitive Guide] One of the most daunting things when I first started looking for a gun was…what size bullet to get? We’ll be covering purely bullet size…and the benefits/weaknesses of each. Now, there’s A LOT of sizes out there but I want to cover the ones you’re most likely to see and/or use. These are the ones that you can walk into just about any sporting goods store and buy. Then we’ll follow up with some bullet terminology and the different types of bullet tips (hollow point, etc), how shotgun shell sizes work, and a breakdown of the components of a round. By the end, you’ll be a bullet pro! Bullet Size & Calibre First! For guns, “calibre” means the diameter of the barrel and thus the diameter of the bullet that is going through it. Also for terminology sake, “bullet” just means the metal projectile, while the entire thing is called a cartridge. We’re going to cover a lot in this article, including: Rimfire vs Centrefire Common Calibres Common Bullet Types Components of Cartridges Rimfire vs Centrefire The first differentiator is between rimfire and centrefire cartridges. The rimfire’s primer is built into the rim while the centrefire cartridge has the primer in the centre. Rimfires are extremely cheap (few cents each) and the .22LR is the most popular rimfire calibre. Common Bullet Calibres There’s A LOT of bullet calibres, but you might not run into more than a handful in your lifetime. We’ll be going over 18 calibres in total I have on hand, but let’s start with the top 11 most common sizes (in my opinion) first. Overview of More Common Bullet Calibres To make things a little more confusing, there’s a mixture of measurements in inches and millimetres. There’s also a unit of weight called a “grain” which is used to denote the weight of bullets. A “grain” is really small since 7000 grains make up one pound. When you talk about bullets at this high of a level, the most high-level trait is “Stopping Power”. This is a relatively vague trait and somewhat controversial. What it boils down to is how many bullets does it take to drop a person. Granted, if you hit someone in the right spot it only ever takes one but in most situations, you’re aiming for centre mass (a.k.a. the chest, a.k.a. the largest target available). Some bullets have enough power or other traits that will cause damage to organs even if you don’t hit them directly. You might also hear about a term called “Hydrostatic Shock” but that’s an entire article unto itself. Now let’s go through some! .22LR The “twenty-two” long-rifle is the most common calibre in terms of units sold. It has a bullet weight of around 30-40 grains and is extremely mild shooting in both pistols and rifles. The recoil is almost non-existent which makes it a great starter round for someone who has never shot a gun or is uncomfortable with the noise. The low price of the bullets is also great for learning sight pictures. It is traditionally the starting calibre for shooters. These things are only a few steps up from a pellet gun round. They can kill, don’t get me wrong, but they’re mostly for killing rats, snakes, and birds. They’ll kill an attacker for sure but it might take a shot or six. I have extremely fond memories of earning my Rifle Shooting merit badge with a .22LR. Many popular handguns and rifles have .22 versions or adapters that let you practice on the platform but use the inexpensive .22LR ammo. .25 ACP Slightly larger than the .22 and slightly more powerful….though not much. The ACP stands for “Automatic Colt Pistol.” There are quite a few guns that use this size but the ammo is more expensive and you’re not getting too much-added benefit other than the inherent reliability that comes with centrefire casings. Slightly more stopping power than the .22 but it’s kind of like the difference between stabbing someone with an ice pick or a knitting needle. Both do the job, but one will leave an ever so slightly larger hole. It’s a tiny round and I’ve yet to use a .25 calibre gun that didn’t work like crap. I’ve used a few flawless .22’s, however. I don’t know why that is. .380 ACP Now we’re getting into the beefy sizes. Personally, I would never use a gun with anything smaller than a .380 as my primary carry weapon. Sometimes called a “9mm Short”, it has seen a major boost in popularity recently thanks to the various “pocket pistols” that have come on the market. This is also a very controversial round. If you ever want to troll a gun forum, just go there and ask “which is better: a .380 or a 9mm?” or “Does a .380 have enough stopping power to use it as a carry?” Watch the arguments start. It’s entertaining. This bullet has relatively low recoil and, at close range, good penetration. They’re a great carry weapon size, in my noobish opinion. Gun author Massad Ayoob once said of the .380 “Some experts will say it’s barely adequate, and others will say it’s barely inadequate”. This is a low power round. Because of the nature of the bullet and the guns that shoot it, it’s going to be relatively useless beyond close-is range. 9mm This pistol round is officially known as the “9x19mm Parabellum” or “9mm Luger” to distinguish it from other 9mm rounds, but you will be fine just saying “nine millimetre” or “nine mil” for those in the know. My personal favourite and if there was a “Goldilocks” round, this would be it. The very first gun I bought

Introduction to Guns Types of Guns: Top 3 You Need to Know There’s tons of types of guns…it really depends how specific you want to get. For us, we consider the three main ones — pistol, rifle, & shotgun. We’ll walk through the main characteristics of each and start to break down sub-categories. Pistol We will be using “pistol” and “handgun” to mean the same thing. a Handgun has the following characteristics: Fired from one hand No support from the shoulder Barrel length of under 16 inches Subsets of pistols include revolvers and semi-automatic pistols. Below is a good representation of handguns with the one on the right being a revolver while the rest are semi-autos. Rifle A rifle usually has the following characteristics: Fired with two hands Braced against the shoulder Fires only one projectile with each pull of the trigger Barrel has rifling which helps spin and stabilize the bullet Barrel length of over 16 inches We’ll be breaking down rifles into two subsets—bolt action and semi-automatic. Popular bolt actions include the Remington 700 series, while the two most popular semi’s are the AR-15 and AK-47. Shotgun Shotguns have smooth barrels to fire a variety of different ammunition. The most common ammo involves lots of metal pellets which spread out. Shotguns has to have: Fired with two hands while braced against the shoulder Fires once per pull of the trigger Smooth barrel Barrel length of over 18 inches We’ll consider two main subsets of shotguns with the pump action & semi-automatic. Pump actions require you to physically move the pump handle to chamber fresh shells and remove spent shells. They have the characteristic chung-chung sound you always hear in movies. Semi-automatics usually utilize gas or recoil to move the shells. The two most popular pumps are the Mossberg 500 series and the Remington 870 series. In the semi-auto world, there are the Benelli’s Conclusion There you have it…a quick primer on pistols, rifles, and shotguns. Here’s an infographic you can save or pin!